There are a number of people in the Northwest who have built Zeniths and I have been fortunate to know and meet a number of them. They are a great community up here and many of them enjoy the type of flying that only the Pacific Northwest can deliver. The backcountry grass strips, the island airstrips, and especially our local sand and gravel bars.
Curt was one of those who had built his CH-701 from scratch and has spent countless hours flying it since. His airplane is well known and loved as the “Clownfish plane”. His color scheme looks like Nemo, from that Pixar movie. Scratch building takes a lot of commitment, and since he had added lots of cool gadgets and updated his panel.

Curt had moved away across the mountains for a while and recently at our EAA Chapter 84 meeting he mentioned his airplane was back. He also mentioned that he had never landed on a gravel bar before, but would like to try it. This started a discussion that eventually went online and last week John, Walt and I got Curt on a messenger group thread and decided Saturday looked good and would be the day we would introduce him to the fun of landing gravel bars.
Doing any sort of off-airport activity requires skill and lots of hours to develop. Dealing with managing the wind, rotors, tight corners, and low altitude, all while being under the power curve in slow flight takes time to practice and you have to know your airplane well. Curt definitely knew his airplane and had experience exploring the local rivers at lower altitudes, it was just time to put the wheels down in a safe place.
I have a number of rules when landing off-airport. The location must be legal. The landing zone must be somewhere safe to operate and be legal. You either need permission from the landowner, or it must be public land without rules limiting access. I also must be able to scout the location and ensure there is a suitable area flat enough to land and roll on, and without major obstacles. This means often scouting low. The FAA allows you to overfly people or property below 500′ AGL for takeoff and landing, but not otherwise. If I know I am landing, or have the intent to land then it is legal to fly over a farmhouse or cars on approach to the gravel bar.

For me, it is not just about being legal. I also don’t ever want to be a bother to anyone, scare anyone, or be a nuisance. So I will only land in places where I had a free path in and out of the area without flying close enough to people, buildings or vehicles to be a bother.
There are a few really good gravel bars within a short flight from Anacortes or Arlington that have large, clear spots with clear approaches and departures that would have made a good spot for Curt’s first gravel bar landing.

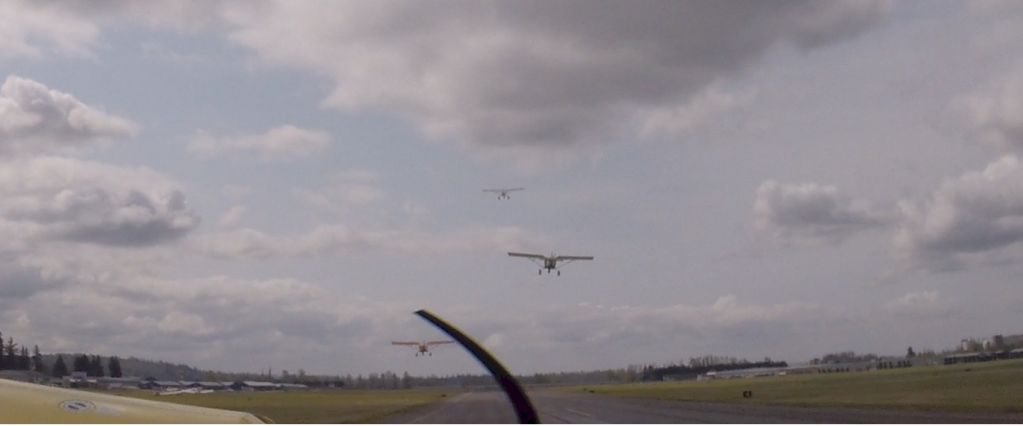
The four of us met up at Curt’s hangar at KAWO and fired up our cameras and airplanes for what would be an epic adventure. We taxied down to the end of 16 and warmed up the planes and when we were all ready I called “Arlington Traffic, Zenith 19JF, flight of four taking off on runway 6 for a north downwind departure”. The four of us rolled out onto the runway and when we were all pointed straight we powered up and quickly lifted off in formation and climbed to pattern altitude.

We headed north to the bend in the river with a large gravel bar called “Dog Leg”. While the approach to it is a tight river with tall trees on either side, with several turns, the gravel bar is flat with plenty of space to park all four airplanes off the “runway”.
I landed first and got out the drone to capture the rest of the crew landing. Walt, John, and then Curt came in one at a time and we got great video and photos and some great shots of all our planes and the pilots parked on the gravel bar.

After doing a few more videos of planes taking off and landing and doing passes over the river and enjoying some conversation we all took off and headed to the Skagit River to land at an anonymous gravel bar a few miles east on I5. It is a beautiful approach and I was able to get 360 video of the river as well as lots of drone shots of the 701’s having fun.

This was the same gravel bar I had landed the previous week and when I had the drone up I saw the spot where I rolled about 80′ on takeoff into the wind and two feet shy of a 3-4′ gully my airplane was airborne. Even if I had not been wheels up I would have sailed right over it anyway, but I was bracing for the hop and it never came.

When we were all done John and Curt headed back to KAWO and Walk and I headed to Center Island to have a snack and relax on the deck for a while. Walt had never been there and I had never had a fly-in guest before so it was a treat for both of us.
I got some great 360 camera footage from my new rig (covered in a different blog post) and it was spectacular! It worked perfectly thru all stages of flight without any visible artifacts from vibration.
It was a really fun time not only sharing the flight and gravel bars with friends and their Zeniths but also sharing the time we had with all the other Zenith owners online. It is something I will have to do again, maybe we will invite even more pilots next time!
Afterthought: John was joking about who got in the air quicker, so I made a video to see..